简介
- 三层架构:展示层 业务逻辑层 数据持久层
- struts2框架:展示层框架,mvc框架
- apache公司
- 并不是struts1的升级版,是webwork升级
- 核心:核心控制器 拦截器
配置环境搭建
1.直接下载导入
http://struts.apache.org/download.cgi,
可根据需要选择 all min src 等包,如果仅仅是学习,选择 min 包就够了
 web.xml
<?xml version="1.0" encoding="UTF-8"?>
<web-app xmlns:xsi="http://www.w3.org/2001/XMLSchema-instance" xmlns="http://java.sun.com/xml/ns/javaee" xsi:schemaLocation="http://java.sun.com/xml/ns/javaee http://java.sun.com/xml/ns/javaee/web-app_2_5.xsd" id="WebApp_ID" version="2.5">
  <display-name>struts2_day01</display-name>
  <!-- 配置常量
  <context-param>
      <param-name>struts.i18n.encoding</param-name>
      <param-value>UTF-8</param-value>
  </context-param>
  -->
  <!-- struts2核心过滤器 -->
  <filter>
      <filter-name>struts2</filter-name>
      <filter-class>org.apache.struts2.dispatcher.ng.filter.StrutsPrepareAndExecuteFilter</filter-class>
  </filter>
  <filter-mapping>
      <filter-name>struts2</filter-name>
      <url-pattern>/*</url-pattern>
  </filter-mapping>

  <welcome-file-list>
    <welcome-file>index.html</welcome-file>
    <welcome-file>index.htm</welcome-file>
    <welcome-file>index.jsp</welcome-file>
    <welcome-file>default.html</welcome-file>
    <welcome-file>default.htm</welcome-file>
    <welcome-file>default.jsp</welcome-file>
  </welcome-file-list>
</web-app>
struts.xml
<?xml version="1.0" encoding="UTF-8"?>
<!DOCTYPE struts PUBLIC
    "-//Apache Software Foundation//DTD Struts Configuration 2.3//EN"
    "http://struts.apache.org/dtds/struts-2.3.dtd">
<struts>

    <!-- i18n:国际化. 解决post提交乱码 -->
    <constant name="struts.i18n.encoding" value="UTF-8"></constant>
    <!-- 指定反问action时的后缀名
        http://localhost:8080/struts2_day01/hello/HelloAction.do
    -->
    <constant name="struts.action.extension" value="action"></constant>
    <!-- 指定struts2是否以开发模式运行
            1.热加载主配置.(不需要重启即可生效)
            2.提供更多错误信息输出,方便开发时的调试
     -->
    <constant name="struts.devMode" value="true"></constant>

    <!-- package:将Action配置封装.就是可以在Package中配置很多action.
            name属性: 给包起个名字,起到标识作用.随便起.不能其他包名重复.
            namespace属性:给action的访问路径中定义一个命名空间
            extends属性: 继承一个 指定包
            abstract属性:包是否为抽象的; 标识性属性.标识该包不能独立运行.专门被继承
      -->
    <package name="hello" namespace="/hello" extends="struts-default" >
        <!-- action元素:配置action类
                name属性: 决定了Action访问资源名.
                class属性: action的完整类名
                method属性: 指定调用Action中的哪个方法来处理请求
         -->
        <action name="HelloAction" class="cn.itheima.a_hello.HelloAction" method="hello" >
            <!-- result元素:结果配置
                    name属性: 标识结果处理的名称.与action方法的返回值对应.
                    type属性: 指定调用哪一个result类来处理结果,默认使用转发.
                    标签体:填写页面的相对路径
            -->
            <result name="success" type="dispatcher" >/hello.jsp</result>
        </action>
    </package>
    <!-- 引入其他struts配置文件 -->
    <include file="cn/itheima/b_dynamic/struts.xml"></include>
    <include file="cn/itheima/c_default/struts.xml"></include>
</struts>
 public class HelloAction {

    public String hello(){

        System.out.println("hello world!");

        return "success";
    }
获取 Servlet Api
 struts.xml
<?xml version="1.0" encoding="UTF-8"?>
<!DOCTYPE struts PUBLIC
    "-//Apache Software Foundation//DTD Struts Configuration 2.3//EN"
    "http://struts.apache.org/dtds/struts-2.3.dtd">
<struts>
    <package name="result" namespace="/" extends="struts-default" >
    <!--  转发 -->
        <action name="Demo1Action" class="cn.itheima.a_result.Demo1Action" method="execute" >
            <result name="success" type="dispatcher" >/hello.jsp</result>
        </action>
    <!-- 重定向 -->
        <action name="Demo2Action" class="cn.itheima.a_result.Demo2Action" method="execute" >
            <result name="success" type="redirect" >/hello.jsp</result>
        </action>
    <!-- 转发到Action -->
        <action name="Demo3Action" class="cn.itheima.a_result.Demo3Action" method="execute" >
             <result name="success" type="chain">
                     <!-- action的名字 -->
                 <param name="actionName">Demo1Action</param>
                     <!-- action所在的命名空间 -->
                 <param name="namespace">/</param>
             </result>
        </action>
        <!-- 重定向到Action -->
        <action name="Demo4Action" class="cn.itheima.a_result.Demo4Action" method="execute" >
            <result  name="success"  type="redirectAction">
                 <!-- action的名字 -->
                 <param name="actionName">Demo1Action</param>
                 <!-- action所在的命名空间 -->
                 <param name="namespace">/</param>
            </result>
        </action>
    </package>
    <include file="cn/itheima/b_api/struts.xml"></include>
    <include file="cn/itheima/c_param/struts.xml"></include>
</struts>
  //如何在action中获得原生ServletAPI
public class Demo5Action extends ActionSupport {

    public String execute() throws Exception {
        //request域=> map (struts2并不推荐使用原生request域)
        //不推荐
        Map<String, Object> requestScope = (Map<String, Object>) ActionContext.getContext().get("request");
        //推荐
        ActionContext.getContext().put("name", "requestTom");
        //session域 => map
        Map<String, Object> sessionScope = ActionContext.getContext().getSession();
        sessionScope.put("name", "sessionTom");
        //application域=>map
        Map<String, Object> applicationScope = ActionContext.getContext().getApplication();
        applicationScope.put("name", "applicationTom");

        return SUCCESS;
    }
}
//如何在action中获得原生ServletAPI
public class Demo6Action extends ActionSupport {
    //并不推荐
    public String execute() throws Exception {
        //原生request
        HttpServletRequest request = ServletActionContext.getRequest();
        //原生session
        HttpSession session = request.getSession();
        //原生response
        HttpServletResponse response = ServletActionContext.getResponse();
        //原生servletContext
        ServletContext servletContext = ServletActionContext.getServletContext();
        return SUCCESS;
    }
}
//如何在action中获得原生ServletAPI
public class Demo7Action extends ActionSupport implements ServletRequestAware {

    private HttpServletRequest request;
    public String execute() throws Exception {

        System.out.println("原生request:"+request);
        return SUCCESS;
    }
    @Override
    public void setServletRequest(HttpServletRequest request) {
        this.request = request;
    }
}
传参
在传统的servlet中我们采用request和response传递参数,但是struts2如果想用同样的方式传递参数,必须先:
HttpServletRequest req = ServletActionContext.getRequest();
HttpServletResponse resp = ServletActionContext.getResponse();
获取request和response
除了以上这种方式,struts2还带了3中传参方式:
- 首先是最简单的get/set方式:只要在继承了ActionSupport父类的struts2类中定义私有成员变量(变量名和jsp页面中上传参数的name相同),并生成get/set方法,即可直接使用。
public class LoginAction extends ActionSupport{

private String username;

public String Login(){

System.out.println("loginaction:"+username);

}

public String getUsername() {
return username;
}
public void setUsername(String username)
{
 this.username = username;
 }
}
jsp的form中:

<form action="login" method="POST" id="form">
<div class="inputText"><span>用户名:
</span><input type="text" name="username" id="username" class="username"></div>
</form>
在java中我们一般会设置bean类,比如这里:
public class User
{

private String username;
public String getUsername() {
return username;
}
public void setUsername(String username) {
this.username = username;}
}
那么我们再传参的时候也可以直接传递User类
但是为了分清楚jsp传递过去的变量时给哪个类的(加入我们的Company类和User类中都有username变量),我们在jsp页面需要进行改动,在name的值中加上前缀(是在action类中声明的类变量),
public class LoginAction extends ActionSupport{

private User user;  //不需要实例化,只需要声明

public String Login(){

System.out.println("loginaction:"+user.username);

}

public String getUser() {  //也需要有get/set方法
return user;
}
public void setUser(String user) {
this.user = user;
}
}
jsp页面只改了name的值,注意是user不是User

<form action="login" method="POST" id="form">
<div class="inputText"><span>用户名: </span><input type="text" name="user.username" id="username" class="username"></div>
</form>
- 比较推荐的第三种方法,后端和前端耦合较少。
这种方法action类需要继承ModelDriven接口。 public class LoginAction extends ActionSupport implements ModelDriven<User> { //这里需要把User加上去 private User user=new User(); //和2中不同,需要实例化User public String Login(){ System.out.println("loginaction:"+user.username); } public User getModel() { //不再需要get/set方法,而是实现ModelDriven接口中的getMode方法,返回值是user。 // TODO Auto-generated method stub return user; } }
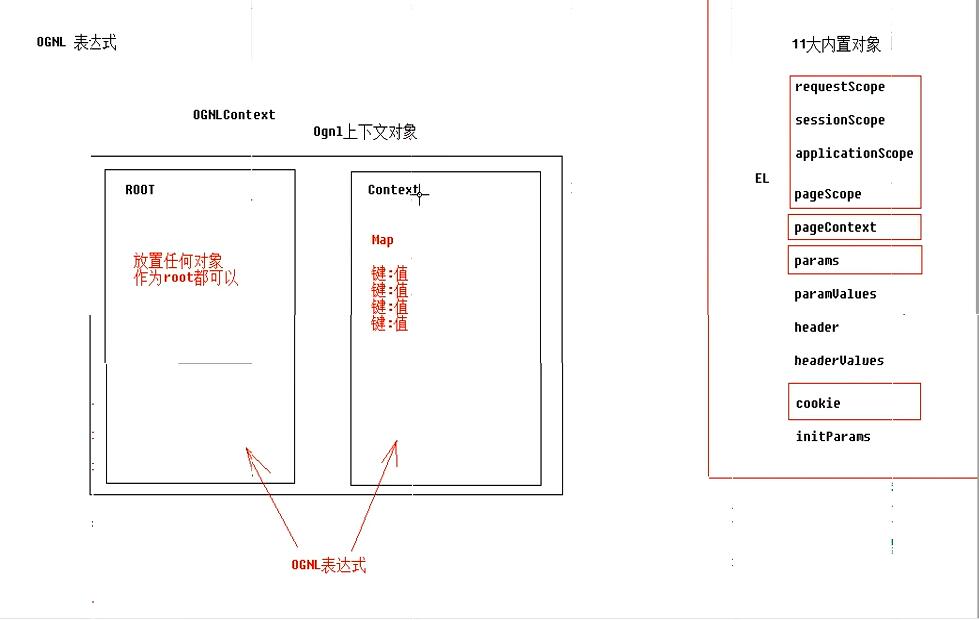
OGNL表达式
package cn.a_ognl;
import java.util.HashMap;
import java.util.Map;
import org.junit.Test;
import cn.bean.User;
import ognl.Ognl;
import ognl.OgnlContext;
import ognl.OgnlException;

//展示OGNL语法
public class Demo {
    @Test
    //准备工作
    public void fun1() throws Exception{
        //准备ONGLContext
            //准备Root
            User rootUser = new User("tom",18);
            //准备Context
            Map<String,User> context = new HashMap<String,User>();
            context.put("user1", new User("jack",18));
            context.put("user2", new User("rose",22));
        OgnlContext oc = new OgnlContext();
        //将rootUser作为root部分
        oc.setRoot(rootUser);
        //将context这个Map作为Context部分
        oc.setValues(context);
        //书写OGNL
        Ognl.getValue("", oc, oc.getRoot());
    }

    @Test
    //基本语法演示
    //取出root中的属性值
    public void fun2() throws Exception{
        //准备ONGLContext
            //准备Root
            User rootUser = new User("tom",18);
            //准备Context
            Map<String,User> context = new HashMap<String,User>();
            context.put("user1", new User("jack",18));
            context.put("user2", new User("rose",22));
        OgnlContext oc = new OgnlContext();
        oc.setRoot(rootUser);
        oc.setValues(context);
        //书写OGNL

        //取出root中user对象的name属性
        String name = (String) Ognl.getValue("name", oc, oc.getRoot());
        Integer age = (Integer) Ognl.getValue("age", oc, oc.getRoot());
        System.out.println(name);
        System.out.println(age);
    }
    @Test
    //基本语法演示
    //取出context中的属性值
    public void fun3() throws Exception{
        //准备ONGLContext
            //准备Root
            User rootUser = new User("tom",18);
            //准备Context
            Map<String,User> context = new HashMap<String,User>();
            context.put("user1", new User("jack",18));
            context.put("user2", new User("rose",22));
        OgnlContext oc = new OgnlContext();
        oc.setRoot(rootUser);
        oc.setValues(context);
        //书写OGNL

        //取出context中键为user1对象的name属性
        String name = (String) Ognl.getValue("#user1.name", oc, oc.getRoot());
        String name2 = (String) Ognl.getValue("#user2.name", oc, oc.getRoot());
        Integer age = (Integer) Ognl.getValue("#user2.age", oc, oc.getRoot());
        System.out.println(name);
        System.out.println(name2);
        System.out.println(age);
    }

    @Test
    //基本语法演示
    //为属性赋值
    public void fun4() throws Exception{
        //准备ONGLContext
            //准备Root
            User rootUser = new User("tom",18);
            //准备Context
            Map<String,User> context = new HashMap<String,User>();
            context.put("user1", new User("jack",18));
            context.put("user2", new User("rose",22));
        OgnlContext oc = new OgnlContext();
        oc.setRoot(rootUser);
        oc.setValues(context);
        //书写OGNL

        //将root中的user对象的name属性赋值
        Ognl.getValue("name='jerry'", oc, oc.getRoot());
        String name = (String) Ognl.getValue("name", oc, oc.getRoot());

        String name2 = (String) Ognl.getValue("#user1.name='郝强勇',#user1.name", oc, oc.getRoot());
        System.out.println(name);
        System.out.println(name2);
    }

    @Test
    //基本语法演示
    //调用方法
    public void fun5() throws Exception{
        //准备ONGLContext
            //准备Root
            User rootUser = new User("tom",18);
            //准备Context
            Map<String,User> context = new HashMap<String,User>();
            context.put("user1", new User("jack",18));
            context.put("user2", new User("rose",22));
        OgnlContext oc = new OgnlContext();
        oc.setRoot(rootUser);
        oc.setValues(context);
        //书写OGNL

        //调用root中user对象的setName方法
        Ognl.getValue("setName('lilei')", oc, oc.getRoot());
        String name = (String) Ognl.getValue("getName()", oc, oc.getRoot());

        String name2 = (String) Ognl.getValue("#user1.setName('lucy'),#user1.getName()", oc, oc.getRoot());


        System.out.println(name);
        System.out.println(name2);
    }


    @Test
    //基本语法演示
    //调用静态方法
    public void fun6() throws Exception{
        //准备ONGLContext
            //准备Root
            User rootUser = new User("tom",18);
            //准备Context
            Map<String,User> context = new HashMap<String,User>();
            context.put("user1", new User("jack",18));
            context.put("user2", new User("rose",22));
        OgnlContext oc = new OgnlContext();
        oc.setRoot(rootUser);
        oc.setValues(context);
        //书写OGNL

        String name = (String) Ognl.getValue("@cn.itheima.a_ognl.HahaUtils@echo('hello 强勇!')", oc, oc.getRoot());
        //Double pi = (Double) Ognl.getValue("@java.lang.Math@PI", oc, oc.getRoot());
        Double pi = (Double) Ognl.getValue("@@PI", oc, oc.getRoot());
        System.out.println(name);
        System.out.println(pi);
    }

    @Test
    //基本语法演示
    //ognl创建对象-list|map
    public void fun7() throws Exception{
        //准备ONGLContext
            //准备Root
            User rootUser = new User("tom",18);
            //准备Context
            Map<String,User> context = new HashMap<String,User>();
            context.put("user1", new User("jack",18));
            context.put("user2", new User("rose",22));
        OgnlContext oc = new OgnlContext();
        oc.setRoot(rootUser);
        oc.setValues(context);
        //书写OGNL

        //创建list对象
        Integer size = (Integer) Ognl.getValue("{'tom','jerry','jack','rose'}.size()", oc, oc.getRoot());
        String name = (String) Ognl.getValue("{'tom','jerry','jack','rose'}[0]", oc, oc.getRoot());
        String name2 = (String) Ognl.getValue("{'tom','jerry','jack','rose'}.get(1)", oc, oc.getRoot());

        /*System.out.println(size);
        System.out.println(name);
        System.out.println(name2);*/
        //创建Map对象
        Integer size2 = (Integer) Ognl.getValue("#{'name':'tom','age':18}.size()", oc, oc.getRoot());
        String name3  = (String) Ognl.getValue("#{'name':'tom','age':18}['name']", oc, oc.getRoot());
        Integer age  = (Integer) Ognl.getValue("#{'name':'tom','age':18}.get('age')", oc, oc.getRoot());
        System.out.println(size2);
        System.out.println(name3);
        System.out.println(age);
    }

}
jsp
<!-- 调试标签 -->
<s:debug></s:debug>
项目路劲
     <form action="${pageContext.request.contextPath}/Demo2Action">
        用户名:<input type="text" name="name" /><br>
        <input type="submit" value="提交" />
    </form>
Struts2标签
国际化
struts2 中使用的 properties 文件来做国际化
全局资源包
<!--
在struts.xml 中配置常量指定全局字符串包位置
-->
<constant name="struts.custom.i18n.resources" value="com.ittianyu.i18n.strings" />
- 包范围的资源包:把 资源包放在某包下面,命名为:package_语言代码_国家代码.properties
- 局部消息资源包:把 资源包放在某动作类路径下,命名为:动作类名称语言代码国家代码.properties
资源包的使用顺序:局部 > 包范围 > 全局!
读取资源包
Action

public class I18nAction extends ActionSupport {
public String execute() {
String value = getText("key");
}
}
jsp

<s:text name="key"/>
手动指定读取的资源包
当注定的包下没有找到指定的值时,会按顺序搜索配置了的资源包
<s:i18n name="com.xxxx.package">
    <s:text name="key"/>
</s:i18n>
文件上传下载
 html
<s:form action="upload.action" enctype="multipart/form-data">
    <s:textfield name="username" label="用户名"/>
    <s:file name="photo" label="照片"/>
    <s:submit value="上传"/>
</s:form>
 action
public class UploadAction extends ActionSupport{
    public String username;
    public File photo;
    public String photoFileName;// 上传文件名。变量命名规格 字段名+FileName
    public String photoContentType;// 上传文件的MIME类型。变量命名规格 字段名+ContentType

    public String upload() {
        // 获取文件存储目录
        ServletContext servletContext = ServletActionContext.getServletContext();
        String path = servletContext.getRealPath("/WEB-INF/files");
        File file = new File(path);
        if (!file.exists())
            file.mkdirs();
        // 存储到目标路径
        photo.renameTo(new File(file, photoFileName));
        return NONE;
    }
}
 修改上传文件大小限制
<!--限制上传最大尺寸为 1048576 byte-->
    <constant name="struts.multipart.maxSize" value="1048576"/>
限制上传文件扩展名
<action name="upload" class="com.ittianyu.javaeetest.web.action.UploadAction" method="upload">
    <interceptor-ref name="defaultStack">
        <param name="fileUpload.allowedExtensions">jpg,png</param>
    </interceptor-ref>
    <result name="input">upload.jsp</result>
</action>
多文件上传需要把
public File photo;
public String photoFileName;// 上传文件名。变量命名规格 字段名+FileName
public String photoContentType;// 上传文件的MIME类型。变量命名规格 字段名+ContentType

改成,也就是改成数组

public File[] photo;
public String[] photoFileName;// 上传文件名。变量命名规格 字段名+FileName
public String[] photoContentType;// 上传文件的MIME类型。变量命名规格 字段名+ContentType
action
public class DownloadAction extends ActionSupport {
    public InputStream inputStream;
    public String filename;

    public String download() throws Exception{
        // 找到文件路径
        String path = ServletActionContext.getServletContext().getRealPath("/WEB-INF/files/1.jpg");
        // 包装成流
        inputStream = new FileInputStream(path);
        // 设置浏览器接收时文件名
        filename = "图片.jpg";

        return SUCCESS;
    }
}
配置
<action name="download" class="com.ittianyu.javaeetest.web.action.DownloadAction" method="download">
    <result name="success" type="stream">
        <!--下载类型为 bin-->
        <param name="contentType">application/octet-stream</param>
        <!--下载打开方式-->
        <param name="contentDisposition">attachment;filename=${@java.net.URLEncoder@encode(filename, "UTF-8")}
        </param>
        <!--流名称-->
        <param name="inputName">inputStream</param>
    </result>
</action>
Validator
struts2为我们共内置了16个验证器,且全部是基于字段的验证器
required
验证字段的值是不是 null。注意,不是空字符串或空白字符串
<validators>
    <field name="password">
        <field-validator type="required">
            <message>The password field is required!</message>
        </field-validator>
    </field>
</validators>
requiredstring
验证字段的值既不是null、也不是空白。
参数:
- fieldName:要验证的字段名
- trim:是否去掉首尾空格
<validators>
  <field name="userName">
      <field-validator type="requiredstring">
          <message>Please input the userName!</message>
      </field-validator>
  </field>
  <field name="password">
      <field-validator type="requiredstring">
          <param name="trim">false</param>
          <message>Please input the password!</message>
      </field-validator>
  </field>
</validators>
int&long short
验证某个字段的值是否可以被转换为一个整数。还可以验证是否在允许的范围内。
参数:
- fieldName:要验证的字段名
- min:允许的最小值
- max:允许的最大值
基于字段的验证
基于验证器的验证<validators> <field name="age"> <field-validator type="int"> <param name="min">18</param> <param name="max">60</param> <message>The age must be between ${min} and ${max}</message> </field-validator> </field> </validators><validators> <validator type="int"> <param name="fieldName">age</param> <param name="min">18</param> <param name="max">60</param> <message>The age must be between ${min} and ${max}</message> </validator> </validators>
double
用来验证某个字段的值是否可以被转换为一个双精度浮点数。还可验证是否在允许的范围内。
参数:
- fieldName:要验证的字段名
- minInclusive:允许的最小值,包含最小值
- maxInclusive:允许的最大值,包含最大值
- minExclusive:允许的最小值,不包含最小值
- maxExclusive:允许的最大值,不包含最大值
<validators>
    <field name="percentage1">
        <field-validator type="double">
            <param name="minInclusive">20.1</param>
            <param name="maxInclusive">50.1</param>
            <message> The age must be between ${ minInclusive } and ${ maxInclusive }(含)</message>
        </field-validator>
    </field>
    <field name="percentage2">
        <field-validator type="double">
            <param name="minExclusive">0.345</param>
            <param name="maxExclusive">99.987</param>
            <message> The age must be between ${ minExclusive } and ${ maxExclusive }(不含)</message>
        </field-validator>
    </field>
</validators>
date
用来确保给定的日期字段的值在指定的范围内。
参数:
- fieldName:要验证的字段名
- min:允许的最小值,包含最小值
- max:允许的最大值,包含最大值
<validators>
    <field name="birthday">
        <field-validator type="date">
            <param name="min">2011-01-01</param>
            <param name="max">2011-12-31</param>
            <message>日期必须为2011年</message>
        </field-validator>
    </field>
</validators>
expression
用于验证是否满足一个OGNL表达式。这是一个非字段的验证。只有给定的参数的返回值是true时才能验证通过。验证不通过时产生一个动作错误,因此要显示该错误,需要使用标签。
<validators>
    <validator type="expression">
        <param name="expression">
            maxNumber>minNumber
        </param>
        <message>最大值必须大于最小值</message>
    </validator>
</validators>
field expression
用于验证某个字段是否满足一个OGNL表达式。这是一个基于字段的验证。只有给定的参数的返回值是true时才能验证通过。验证不通过时产生一个字段错误。
参数:
- fieldName:要验证的字段名
- expression:OGNL表达式,只有该表达式为true才能验证通过
<validators>
    <field name="maxNumber">
        <field-validator type="fieldexpression">
            <param name="expression">
            maxNumber>100
        </param>
        <message>最大值必须大于最小值1</message>
        </field-validator>
    </field>
</validators>
用来验证给定的字段是否符合一个Email的规范。它的正则表达式为
\b(^_A-Za-z0-9-*@([A-Za-z0-9-])+((\.com)|(\.net)|(\.org)|(\.info)|(\.edu)|(\.mil)|(\.gov)|(\.biz)|(\.ws)|(\.us)|(\.tv)|(\.cc)|(\.aero)|(\.arpa)|(\.coop)|(\.int)|(\.jobs)|(\.museum)|(\.name)|(\.pro)|(\.travel)|(\.nato)|(\..{2,3})|(\..{2,3}\..{2,3}))$)\b
<validators>
    <field name="email">
        <field-validator type="email">
            <message>请输入正确的邮箱</message>
        </field-validator>
    </field>
</validators>
url
来验证给定的字段值是否是一个合法的URL地址
<validators>
    <field name="url">
        <field-validator type="url">
            <message>请输入正确的地址</message>
        </field-validator>
    </field>
</validators>
visitor
该验证程序可以提高代码的可重用性,你可以利用它把同一个验证程序配置文件用于多个动作
<validators>
    <field name="streetName">
        <field-validator type="requiredstring">
            <message>请输入正确街道地址</message>
        </field-validator>
    </field>
</validators>

<validators>
    <field name="address">
        <field-validator type="visitor">
            <message>Address:</message>
        </field-validator>
    </field>
</validators>
stringlength
用来验证一个非空的字段值是不是有足够的长度。
regex
用来检查给定字段是否与给定的正则表达式相匹配。正则表达式的详细内容可以参考 JDK 的 java.util.regex.Pattern 类。
参数:
- fieldname:要验证的字段名
- expression:正则表达式
- caseSensitive:是否区分大小写的情况,默认 true
- trim:是否去掉首尾空格,默认 true
<validators>
  <field name="userName">
      <field-validator type="regex">
          <param name="expression"><![CDATA[([aAbBcCdD][123][eEfFgG][456])]]></param>
          <message> 用户名必须符合规范</message>
      </field-validator>
  </field>
</validators>
拦截器Interceptor
Struts2 拦截器在访问某个 Action 方法之前或之后实施拦截, Struts2 拦截器是可插拔的, 拦截器是 AOP 的一种实现.
常用拦截器
- conversionError:将错误从ActionContext中添加到Action的属性字段中
- fileUpload:提供文件上传功能
- i18n:记录用户选择的locale
- model-driven:如果一个类实现了ModelDriven,将getModel得到的结果放在Value Stack中
- params:将请求中的参数设置到Action中去
- servletConfig:提供访问HttpServletRequest和HttpServletResponse的方法,以Map的方式访问
- token:避免重复提交
- validation:使用 action-validation.xml文件中定义的内容校验提交的数据
- workflow:调用 Action 的 validate 方法,一旦有错误返回,重新定位到 INPUT 视图
自定义拦截器
public class PermissionInterceptor implements Interceptor {
private static final long serialVersionUID = -5178310397732210602L;
public void destroy() {
}
public void init() {
}
public String intercept(ActionInvocation invocation) throws Exception {
System.out.println("进入拦截器");
if(session里存在用户){
String result = invocation.invoke();
}else{
return “logon”;
}
//System.out.println("返回值:"+ result);
//return result;
}
}
在 struts.xml 文件中配置自定义的拦截器
<package name="itcast" namespace="/test" extends="struts-default">
<interceptors>
<interceptor name=“permission" class="cn.itcast.aop.PermissionInterceptor" />
<interceptor-stack name="permissionStack">
<interceptor-ref name="defaultStack" />
<interceptor-ref name=" permission " />
</interceptor-stack>
</interceptors>
<action name="helloworld_*" class="cn.itcast.action.HelloWorldAction" method="{1}">
<result name="success">/WEB-INF/page/hello.jsp</result>
<interceptor-ref name="permissionStack"/>
</action>
</package>
Action响应ajax请求
发送ajax请求使用stream进行响应
定义Action
public class UserAction
 {
     private String uname;
     //声明输入流对象
     private InputStream inputStream;
     public InputStream getInputStream()
     {
         System.out.println("-------------getInputStream");
         return inputStream;
     }
     public String getUname()
     {
         return uname;
     }
     public void setUname(String uname)
     {
         this.uname = uname;
     }
     //org.apache.struts2.dispatcher.StreamResult
     /**验证用户名的唯一性***/
     public String unameIsExists()
     {
         System.out.println("----------unameIsExists");
         List<String> list = new ArrayList<String>();
         list.add("admin");
         list.add("lisi");
         String msg=null;
        if(list.contains(uname))
         {
             msg="用户名可用...";
         }
         else
         {
             msg="用户名可用...";
         }
         //将msg响应到客户端,将msg中的数据封装到InputStream
         try
         {
             inputStream=new ByteArrayInputStream(msg.getBytes("UTF-8"));
         }
         catch (Exception e)
         {
             // TODO Auto-generated catch block
             e.printStackTrace();
         }
         return "ajax";
     }
 }
配置UserAction
 <?xml version="1.0" encoding="UTF-8"?>
   <!DOCTYPE struts PUBLIC
      "-//Apache Software Foundation//DTD Struts Configuration 2.3//EN"
      "http://struts.apache.org/dtds/struts-2.3.dtd">
 <struts>
     <package name="user" namespace="/" extends="struts-default">
         <action name="userAction_*" class="com.guangsoft.action.UserAction"
             method="{1}">
             <result name="ajax" type="stream">
                 <param name="inputName">inputStream</param>
             </result>
         </action>
     </package>
 </struts>
实现UI页面
<script type="text/javascript" src="js/jquery-1.8.3.min.js"></script>
 <script type="text/javascript">
     function sendReuqest()
     {
     var uname=$("#uname").val();
     $.post("userAction_unameIsExists.action","uname="+uname,function(data)
     {
     $("#sp").html(data);
     });
     }
 </script>
</head>
 <body>
     <input type="text" id="uname" onblur="sendReuqest()" />
     <span id="sp"></span>
 </body>
 当请求发送到服务器上,先执行处理请求的方法,通过处理请求的方法的返回值,查找对应的result,如果result的type属性为stream,自动调用inputName属性对应的值对应的get方法,获得流对象。
发送ajax请求使用json响应
加入jar包
struts2-json-plugin-2.3.16.1.jar
建立Action
 public class UserAction2
 {
     UsersDao dao = new UsersDaoImpl();
     private Users user;
     private List<Users> ulist;
     //将ulist集合作为json对象的集合响应到客户端
     public List<Users> getUlist()
     {
         System.out.println("-----------getUlist");
         return ulist;
     }
     public Users getUser()
     {
         return user;
     }
     public void setUser(Users user)
     {
         this.user = user;
     }
     //org.apache.struts2.json.JSONInterceptor
     /***验证用户名是否可以:将不可用的用户名全部响应到客户端**/
     public String unameExistsList()
     {
         System.out.println("-------------unameExistsList");
         ulist=dao.selectUanemByUname(user.getUname());
         //将ulist集合作为json对象的集合响应到客户端
         return "ajax";
     }
建立UI页面
 <head>
     <script>
         function sendReuqest()
         {
             var uname=$("#uname").val();
             $.post("userAction2_unameExistsList.action","user.uname="+uname,function(data)
             {
                 //alert(data);
                 var div=$("#div");
                 div.html(""); //清空
                 //对json集合进行遍历
                 $(data).each(function(index,item)
                 {
                     //alert(index+" "+item);
                     //div.html(item.uname);
                     div.append("
                     <div>"+item.uname+"</div>
                     ")
                 });
             });
         }
     </script>
 </head>
 <body>
     <!-- <input type="text" id="uname" onblur="sendReuqest()"/><span id="sp"></span> -->
     <input type="text" id="uname" onkeyup="sendReuqest()" />
     <div style="border:  solid 1px red; width: 20%;margin-top: 5px" id="div">
     </div>
 </body>
将需要响应到客户端的数据封装为inputStream对象
将msg的内容封装为InputStream对象
结果的类型必须为stream,将流对象的名字赋值给inputName属性
将需要使用json格式响应到客户端的数据封装到list集合
给ulist属性赋值,自动调用ulist对应的get方法
Struts2的零配置(注解)
基本使用
1.struts2通过一个插件:struts2-convention-plugin-2.3.20.jar
- 该插件可以完全抛弃struts2的xml配置文件,甚至连注解也不用写
在 Action 类上加上 @ParentPackage(“struts-default”)
在对应的方法上加上@Action(value = "hello", results = { @Result(name = "success", location="/hello.jsp")})@ParentPackage("struts-default") public class HelloAction extends ActionSupport { @Action(value = "hello", results = { @Result(name = "success", location="/hello.jsp")}) public String hello() throws Exception { System.out.println("hello world!"); return SUCCESS; } }
向 Action 传递参数
登录是很常见的 action,这个时候一般要向服务器传递 username, password 等。
public class User {
    private String username;
    private String password;
    public String getUsername() {
        return username;
    }
    public void setUsername(String username) {
        this.username = username;
    }
    public String getPassword() {
        return password;
    }
    public void setPassword(String password) {
        this.password = password;
    }
}
创建一个 UserAction 来处理请求,简单起见,使用注解方式配置
@ParentPackage("struts-default")
public class UserAction extends ActionSupport implements ModelDriven<User>{
    private User user = new User();
    @Action(value = "login", results = {
               @Result(name = "success", location="/home.jsp")})
    public String login() throws Exception {
        System.out.println(user.getUsername());
        System.out.println(user.getPassword());
        return SUCCESS;
    }
    @Override
    public User getModel() {
        return user;
    }
}
实现 ModelDriven 方法,返回 user。
然后在执行 login 方法之前,ModelDriven 拦截器会给 user 设置请求提交的值。
标签
tag1.jsp
<%@ page language="java" contentType="text/html; charset=UTF-8"
    pageEncoding="UTF-8"%>
   <%@ taglib prefix="s" uri="/struts-tags" %>
<!DOCTYPE html PUBLIC "-//W3C//DTD HTML 4.01 Transitional//EN" "http://www.w3.org/TR/html4/loose.dtd">
<html>
<head>
<meta http-equiv="Content-Type" content="text/html; charset=UTF-8">
<title>Insert title here</title>
</head>
<body>
<!-- 遍历标签 iterator -->
<!-- ------------------------------------- -->
<s:iterator value="#list" >
    <s:property /><br>
</s:iterator>
<!-- ------------------------------------- --><hr>
<s:iterator value="#list" var="name" >
    <s:property value="#name" /><br>
</s:iterator>
<!-- ------------------------------------- --><hr>
<s:iterator begin="1" end="100" step="1"  >
    <s:property />|
</s:iterator>
<!-- ------------------if else elseif------------------- --><hr>

<s:if test="#list.size()==4">
    list长度为4!
</s:if>
<s:elseif test="#list.size()==3">
    list长度为3!
</s:elseif>
<s:else>
    list不3不4!
</s:else>

<!-- ------------------property 配合ognl表达式页面取值 ------------------- --><hr>

<s:property value="#list.size()" />
<s:property value="#session.user.name" />

</body>
</html>
package cn.itcast.b_tag;

import java.util.ArrayList;
import java.util.List;

import com.opensymphony.xwork2.ActionContext;
import com.opensymphony.xwork2.ActionSupport;

public class Demo2Action extends ActionSupport {


    public String execute() throws Exception {

        List<String> list = new ArrayList<>();
        list.add("tom");
        list.add("jerry");
        list.add("jack");
        list.add("rose");
        list.add("hqy");

        ActionContext.getContext().put("list", list);
        return SUCCESS;
    }
}
配置
<?xml version="1.0" encoding="UTF-8"?>
<!DOCTYPE struts PUBLIC
    "-//Apache Software Foundation//DTD Struts Configuration 2.3//EN"
    "http://struts.apache.org/dtds/struts-2.3.dtd">
<struts>
    <package name="tag" namespace="/" extends="struts-default">
        <action name="Demo2Action" class="cn.itcast.b_tag.Demo2Action"
            method="execute">
            <result name="success" type="dispatcher">/tag1.jsp</result>
        </action>
    </package>
</struts>